Reference & troubleshooting
Troubleshooting
Keyed to what you actually see. Every entry here is something a real install has hit — find the one that matches your symptom in the list on the left.
It boots to a login prompt and serves nothing
Appliance only
The console shows testvibe login: and nothing answers in a browser.
Nearly always: only one of the two disks is attached.
Here is that notice on a real screen. We produced it deliberately, by importing the 0.4.3 image and powering it on with only the OS disk attached — the exact mistake the message describes. It sat like this indefinitely; nothing else ever appeared:
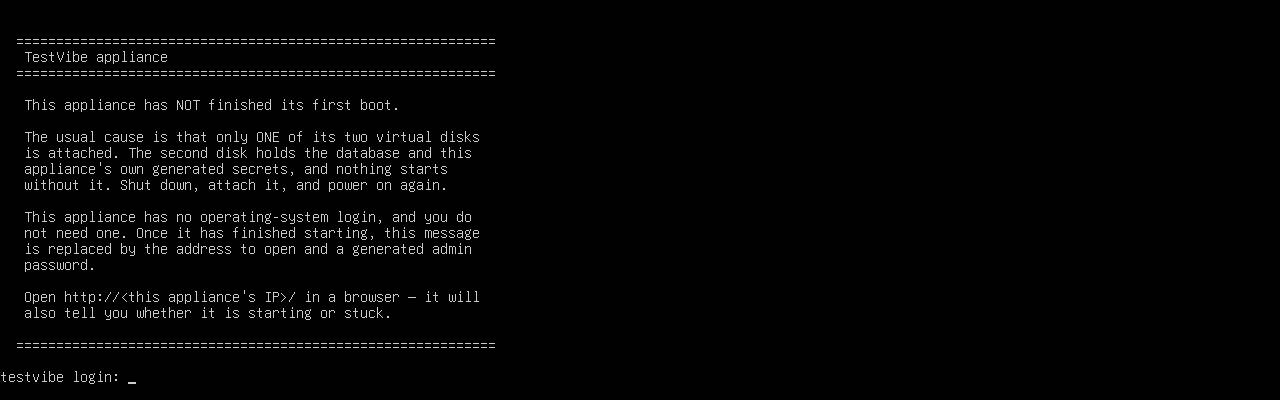
If your console looks like this, do not wait it out and do not reset — shut down, attach the second disk, and power on again. No data is lost by doing so.
- Read the console. If the text above the prompt is the "has NOT finished its first boot" notice, the appliance is telling you exactly this. If it is the "first boot complete" banner with an address and a password, the appliance is healthy — you are looking at a login prompt you never need, and the thing to do is open the address in a browser.
- Check the disk count in your hypervisor. Hyper-V:
Get-VMHardDiskDrive -VMName "…"must list two. VirtualBox and VMware: the VM's storage settings must show two hard disks. - Shut down, attach the missing data disk, power on. Nothing is lost — the appliance refuses to write its identity anywhere except the data disk precisely so that this is recoverable.
- If both disks are attached, browse to
http://<ip>/. A "TestVibe is starting" page means it is still working; give it up to 20 minutes on slow storage. Anything else, take a serial console capture and send it to us.
It has no IP address
Appliance only
- Confirm the adapter is connected to a switch or network that hands out DHCP addresses. The appliance configures whatever adapter it is given — it does not care about the model — but it does need DHCP.
- Check your DHCP server's lease table for the hostname
testvibeor the VM's MAC. If there is no lease, the problem is in the network, not in the appliance. - If the banner says
http://127.0.0.1, the appliance came up before DHCP answered on its first boot and seeded that address into its public URLs. Detection runs once and is not repeated — but you can simply correct the values. Fix the network, then open the console and go to Addresses. Set Application URL tohttp://<ip>:8080and Artifact URL tohttp://<ip>:8090, using the address the appliance now has.- Both fields are editable there. There is no need to rebuild, and no need to replace the data disk.
- These two are read only at startup, so restart afterwards: power the VM off and on from your hypervisor.
- You should see "Application URL saved — restart the instance for it to take effect."
- There is no way to type in a static address, because there is no OS login. Use a DHCP reservation on the VM's MAC address; that is the supported way to give the appliance a fixed address, and it is worth doing before the first boot.
Nothing answers on port 80 — or "I tried 80 and 443"
Appliance only
- There is no HTTPS. Nothing listens on 443. Use
http://, and note that many browsers now try HTTPS first — type thehttp://prefix explicitly. - Give it 60 seconds after power-on. Port 80 comes up early but not instantly.
- Try the direct ports:
http://<ip>:8080for the application andhttp://<ip>:5120for the console. If those answer and 80 does not, tell us — that is a fault worth a bug report. - If nothing answers on any port, you are probably looking at the wrong address (see "It has no IP address"), or a firewall between you and it. URLs and ports lists who needs to reach what.
- On releases before 0.4.2 nothing listened on port 80 at all. If you are running an older appliance, use 8080 and 5120 — and upgrade, because those images have a more serious problem (see the withdrawn images).
I do not have the administration password
Appliance only
- Press Enter at the VM console. The banner is redrawn above the login prompt every time the prompt is drawn — it is not a one-time print, and it survives reboots.
- Reboot the VM if the console is showing something else entirely.
- Read it off a copy of the data disk — the last-resort procedure in Finding the IP address and the admin password.
- Nobody can reset it remotely. The password is generated on your appliance and never leaves it. That is the property that stops one downloaded image from carrying a credential that opens every customer's install — and, for the record, it is exactly what went wrong in the withdrawn 0.4.0 and 0.4.1 images.
I only attached one disk and it has been running like that
Appliance only
Then it has not been running: no TestVibe service can start without the data disk, and the appliance refuses to write its identity onto the disposable OS disk rather than lose it at the first upgrade. Shut down, attach the data disk that came with the release, and power on. The first boot completes normally and you have lost nothing — because nothing was ever created.
If you deleted the data disk after extracting it, download the release again — the data disk in a fresh download is empty and identical to the one you discarded.
What the console looks like in this state is photographed above — an appliance in this condition never gets past that notice.
"No bootable medium found!" (VirtualBox)
Appliance only
Firmware. The appliance is UEFI/GPT and VirtualBox imported it as BIOS.
Settings → System → Motherboard → Enable EFI, or
VBoxManage modifyvm "TestVibe-0.4.3" --firmware efi.
Then start it again — nothing was damaged.
The Hyper-V VM will not boot at all
Appliance only
- Is it Generation 2? Generation 1 is BIOS and cannot boot this image. Generation cannot be changed after creation — make a new VM.
- Secure Boot template. Set it to "Microsoft UEFI Certificate
Authority", or turn Secure Boot off:
PowerShell
Set-VMFirmware -VMName "TestVibe" -SecureBootTemplate MicrosoftUEFICertificateAuthority
# or, to disable it entirely:
Set-VMFirmware -VMName "TestVibe" -EnableSecureBoot Off
- Is the OS disk the first boot entry?
Set-VMFirmware -VMName "TestVibe" -FirstBootDevice (Get-VMHardDiskDrive -VMName "TestVibe")[0]
Traces and screenshots do not load, but the app works
Artifacts are fetched by your browser straight from the object store, not
through the app. So TV_BLOBSERVER_PUBLIC_URL ("Artifact URL") must name
an address your desktop can reach. localhost,
127.0.0.1 and an in-cluster service name only ever work on the server
itself.
- Appliance: port 8090. Fix the value under Console → Addresses and restart, and open 8090 between you and the appliance.
- Docker Compose: the blob server is published on port
8080. Set
TV_BLOBSERVER_PUBLIC_URLin.envanddocker compose up -d. - Kubernetes:
--set blobserver.publicUrl=https://artifacts.your.host, or--set ingress.enabled=true --set ingress.host=testvibe.your.host.
I signed up but I cannot sign in — no verification email arrived
You signed up through the application's own form, and now sign-in is refused. The account is fine. It is parked, not broken.
TV_SIGNUP_MODE=open or through an invite link.
What is actually happening
- Creating an account does not sign you in. It sends a verification link and shows a "Check your email." panel.
- Trying to sign in before clicking that link is refused with "Please verify your email before signing in. Check your inbox for the link." There is no self-hosted bypass for this, and no setting that turns it off.
- If no mail relay was configured when you registered, that link was written to the web service's standard output and delivered nowhere.
- Single sign-on does not avoid it. A brand-new account arriving via GitHub, Google or OpenID Connect is asked to confirm its address and is blocked the same way.
The fix — from most likely to least
- Configure Mail in the administration console.
http://<ip>/admin→ Mail. Required: SMTP relay host and From address. Press Send test and wait for that message to actually arrive. No restart is needed — the application picks the settings up within about a minute. - Ask for a new link. Back in the application,
attempt the sign-in with the account you created. The refusal comes with
a Resend verification email link; the
"Check your email." panel shown straight after registering has a
Resend email button that does the same. The new link goes
through the relay you have just configured.
- The failed sign-in is what tells the page which account to resend for. Asking cold gets "Sign in first so we know which account to verify."
- Resends are rate-limited. "Please wait a minute before requesting another email." means exactly that — wait, do not keep clicking.
- Verification links expire after 24 hours, so an old one sitting in a mailbox may simply have lapsed. Clicking a lapsed link says "That verification link is invalid or expired. Sign in to request a new one." — which is exactly what to do.
- If the test message arrives but the verification email does not, the relay is fine and the problem is the recipient side: check spam and quarantine for the From address you configured, and check that the relay is willing to send to that domain.
- If the link arrives but goes nowhere when clicked, the install's public address is wrong — the link is built from it. Fix it in the console: Addresses → Application URL, then restart. See the setup checklist.
Two things that are not the problem
- The administration password.
adminand the console password open the console and nothing else. It is not an application account and has no row in the database. It can make the very first application user, from the First user panel — but only while the install has none, so it is no help to an account that already exists. Creating the first application user explains the split. - The license. An unlicensed install inside its grace window still sends mail and still lets people sign up. If the instance has gone read-only you would see a different symptom.
Sign-in and invitation emails never arrive
- If this is the very first account on a new install, read "I signed up but I cannot sign in" above first — it is the same cause with a specific fix.
- Use the console's Send test button — it pushes a real message through the configured settings and reports the failure to you instead of to a colleague's absent invitation.
- Port 465 is not supported. Use 587 with STARTTLS, or 25 on an internal relay.
- Microsoft 365 and Google Workspace need an app password or service account, not a person's password.
- The from-address must be on a domain your relay is willing to send for.
The instance went read-only
The license grace window lapsed — 14 days by default, counted from when the instance first found itself unlicensed. New runs, generations and load tests stop; existing data stays readable. Copy the install ID from the console's License panel, activate it on the portal, paste the license back into the console. It takes effect on the next licensing pass, or immediately if you restart.
I reset the VM while it was starting
Appliance only
Current releases repair themselves: an interrupted first boot is detected and redone, and the one value that must never change — the secret-protection key — is preserved if it had already been written. Boot it again and watch the console.
If it still does not complete, the appliance will say what it is refusing to do and why. Capture the console and send it to us rather than power-cycling again.
Running a withdrawn 0.4.0 or 0.4.1 appliance
Appliance only
The current image proves its disks still seal themselves per copy before it is published, so a new install is not affected. For an existing 0.4.0 or 0.4.1 appliance, treat every credential it generated as shared:
- If the install has little or no data yet, the clean answer is a fresh install of the current release on a new data disk, and re-activating your license — which is free for an install ID you already own. That is the only path that replaces the shared secret-protection key as well as the shared password.
- If it holds data you need, upgrade by the normal disk swap — your data disk carries the install across — and then email support@testvibe.com before you put anything sensitive in it. The disk swap keeps the appliance's existing credentials by design, and rotating them is not something the appliance can do for itself.
- Either way, restrict network access to the appliance until it is on the current release — the shared credential is only exploitable by someone who can reach it.
Docker Compose and Kubernetes
A container deployment has no VM console, no banner, no two disks and no serial port, so every entry marked Appliance only is not for you. These are. (Entries 08 to 11 — traces, verification email, mail and read-only — apply to you as well.)
First: is everything actually running?
Docker Compose — from
the folder holding docker-compose.yml:
docker compose ps
- You should see
webandblobserverreportinghealthy, andmigrateasExited (0). migrateexiting with anything other than 0 is the next entry.- A service that keeps restarting: read its log, below.
Kubernetes:
kubectl -n testvibe get pods
kubectl -n testvibe rollout status deploy/testvibe-web
- You should see every pod
Runningand the rollout report "successfully rolled out". - If it sits there instead, the pod is waiting on something — the entries below are the two usual reasons.
Reading a service's log
docker compose logs web
docker compose logs migrate
docker compose logs blobserver
docker compose logs admin
The service names are
postgres, migrate, blobserver,
runner, browser, web and
admin. On Kubernetes:
kubectl -n testvibe logs deploy/testvibe-web
kubectl -n testvibe logs -l app.kubernetes.io/component=migrations
Every pod sits in ImagePullBackOff
The images are private and the cluster has no credential for them. Create the pull secret and tell the release to use it:
kubectl -n testvibe create secret docker-registry testvibe-registry \
  --docker-server=testvibe.azurecr.io \
  --docker-username=<token-name> \
  --docker-password=<token-password>

helm upgrade testvibe oci://testvibe.azurecr.io/charts/testvibe \
  --namespace testvibe --reuse-values \
  --set global.imagePullSecrets[0].name=testvibe-registry
- You should see the pods leave
ImagePullBackOffwithin a minute. - Confirm the reason first with
kubectl -n testvibe describe pod <pod>— the Events at the bottom name it. - On Compose the same problem reads
deniedormanifest unknown. Fix it withdocker login testvibe.azurecr.io -u <token-name>.
The schema job exited non-zero
Nothing else can work: the app and the console both wait for the schema. Read that job's log first — it prints the script it stopped on.
docker compose logs migrate
- Cannot reach the database. Check
postgresishealthy, and thatTV_PG_PASSWORDin.envis the password the database was created with. Changing it later does not change the database's own password. - It succeeded once and now fails. That is a real bug — send us the log rather than deleting the volume.
- On Kubernetes the job is
Failedinkubectl -n testvibe get jobs, and the app pods stayInit:0/1because theirwait-for-schemainit container is holding them back. That is the design working, not a second fault.
The stack is up but nobody can sign in
Expected on a fresh install: it has no application accounts, and the console
password is not one. Create the first user in the console's
First user panel — which needs
TV_BOOTSTRAP_TOKEN (Compose) or
secrets.bootstrapToken (Helm) to be set.
The full walkthrough →
Getting us a diagnostic from a container deployment
Collect this and email it to support@testvibe.com:
docker compose ps > testvibe-diag.txt
docker compose logs --no-color --tail=500 >> testvibe-diag.txt
docker version >> testvibe-diag.txt
kubectl -n testvibe get pods -o wide > testvibe-diag.txt
kubectl -n testvibe describe pods >> testvibe-diag.txt
kubectl -n testvibe logs deploy/testvibe-web --tail=500 >> testvibe-diag.txt
kubectl -n testvibe logs -l app.kubernetes.io/component=migrations --tail=500 >> testvibe-diag.txt
helm -n testvibe get values testvibe >> testvibe-diag.txt
REDACTED.
Tell us the release version, whether it is Compose or Kubernetes, and what the app's URL returns in a browser.
Getting us a diagnostic when nothing else works
Appliance only
The appliance writes its boot log to a serial port as well as to the screen. On Hyper-V, Generation 2 VMs have no COM port unless you add one — this is the single most useful thing you can do before reporting a boot problem:
# VM must be off. Then start it and connect to the pipe with a terminal
# that speaks named pipes (PuTTY: Serial line = \\.\pipe\testvibe-console).
Set-VMComPort -VMName "TestVibe" -Number 1 -Path "\\.\pipe\testvibe-console"
On VMware and VirtualBox, add a serial port backed by a file and send us the file. Failing that, a photograph of the VM console is genuinely useful — the appliance is designed to explain itself there.
Email support@testvibe.com with the release
version, the hypervisor and its version, what the console shows, and what
http://<ip>/ returns.